Importing Asset Purchasing Data
Chromebook Assets Importing Purchasing Data Quick Reference
To commence tracking your Chromebook assets in SyAM's Asset Management prior to their arrival at the loading dock, you can utilize the information supplied by your vendor through the packing slip or invoice. These documents typically contain the serial numbers of the shipped devices, which can be used for tracking purposes.
Creating your Chromebook Import Sheet from vendor Invoice
Step 1 – Copy the serial numbers form the invoice/packing slip to Excel
When you copy the serial numbers from your vendors pdf invoice, they may all appear on a single row

Select the row and choose Copy
Move down to an empty row and right click and select paste special – transpose
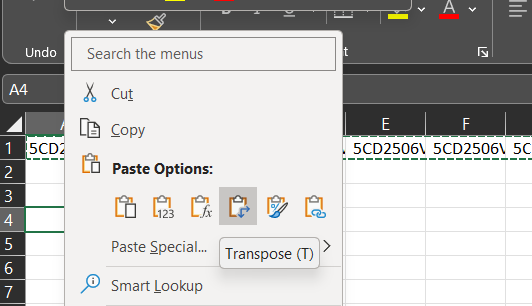
This will now put the serials into a single column
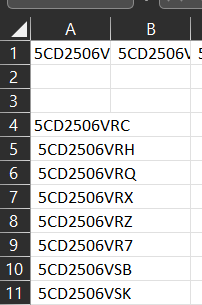
Delete the first row and the empty rows above the serial numbers
If your serial number is prefixed with a space, use the following formula to remove the space
=TRIM(SUBSTITUTE(A2, " ", ""))
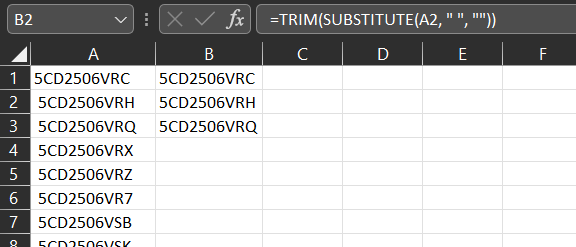
Copy the formula down to convert all listed serial numbers
Step 2 – Create a new excel sheet with the column headings of the fields you wish to import
A quick way to create this file is to export a single asset, this will give you all the field names in row 1, delete the columns you will not be updating in the Asset Database.
In our example we have the following columns
Asset Name
Date Installed
Serial Number
Purchase Price
Purchase Order
Warranty Expiry Date
Vendor
Warranty (Months)
Classification
Status
We Only need Classification and Status if the devices have not yet been enrolled into GAC
Copy the serial numbers from Column B in our serial number worksheet as they have the prefixed space removed
When pasting the serial numbers paste special and select Values
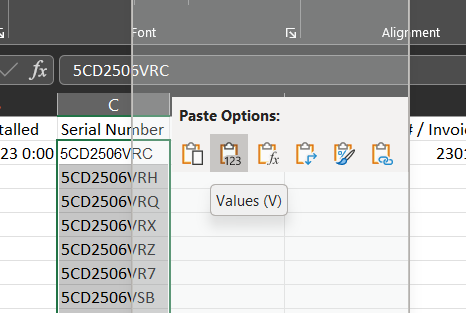
Remember to Paste the values into the Serial Number and Asset Name columns
Enter the other data you wish to import at this time, make sure you format the data according to the field, example dates are formatted 12/15/2022 0:00
Save the file as a CSV format
Remember to make sure there are no extra rows in the csv file. To check you can open the csv file in notepad and go to the end of the file and make sure there are no extra comma’s or delete the rows below the last row of data in excel.
Importing the csv file
Log into Asset Management and select the import icon on the header bar
Choose the csv file that you saved with the date you wish to import.
If this is the first time importing it is recommended to create a csv file with only 2-3 rows to import
Check Asset Name to be the field to check for to update if it already exists or add new if it doesn’t exist.
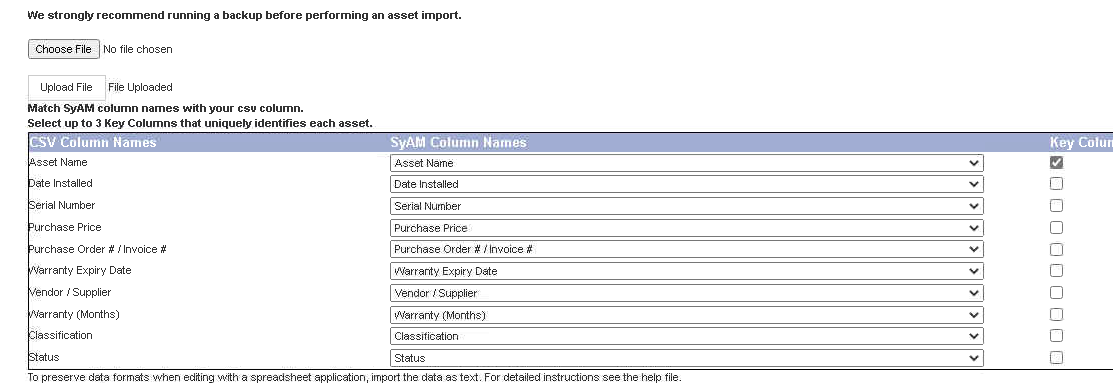
Press Import. The data will be imported, and the asset database will be updated.