Disabling User Account Control Using SyAM
Disabling User Account Control using SyAM Management Utilities
User Account Control (UAC) can be disabled on client systems by using the Third Party Software Deployment feature of SyAM Management Utilities.
Requirements: This procedure supports Windows 7 and Windows 8. For Management Utilities versions before 5.12, target systems must have the SyAM System Client installed and reporting to SyAM System Area Manager; with Management Utilities 5.12 this is no longer a requirement. Target systems must be discovered by Management Utility.
This procedure is intended for non-domain systems. In an Active Directory domain, use Group Policy to configure UAC. An example showing how this can be done is provided at the end of this document.
Use your preferred text editor to create a batch file. The batch script reads the Windows registry to determine the client system OS and the status of UAC. If the operating system is supported, and UAC is enabled, the registry is updated. The system is then restarted, with a one-minute warning message displayed to the user.
In Windows 8, completely disabling UAC as we do in Windows 7 will cause many Metro apps to fail. The script is designed to duplicate the registry configuration that results when the sliding control in the Windows interface is set to its “off” position.
REM @ECHO OFF
REM This batch script modifies the Windows Registry to disable User Account Control.
REM After the Registry is updated, the system is rebooted.
REM Supported operating systems: Windows 7, Windows 8.
REM Exit if OS is not supported
reg QUERY "HKLM\SOFTWARE\Microsoft\Windows NT\CurrentVersion" /v ProductName | find "Windows 7" > nul
IF %ERRORLEVEL% EQU 0 GOTO win7check
reg QUERY "HKLM\SOFTWARE\Microsoft\Windows NT\CurrentVersion" /v ProductName | find "Windows 8" > nul
IF %ERRORLEVEL% EQU 0 GOTO win8check
GOTO end
:win7check
REM Exit if UAC is already disabled
reg QUERY HKLM\SOFTWARE\Microsoft\Windows\CurrentVersion\Policies\System /v EnableLUA | find "0x0" > nul
IF %ERRORLEVEL% NEQ 0 GOTO win7disable
GOTO end
:win8check
REM Exit if UAC is already configured correctly
reg QUERY HKLM\SOFTWARE\Microsoft\Windows\CurrentVersion\Policies\System /v PromptOnSecureDesktop | find "0x0" > nul
IF %ERRORLEVEL% NEQ 0 GOTO win8disable
reg QUERY HKLM\SOFTWARE\Microsoft\Windows\CurrentVersion\Policies\System /v EnableLUA | find "0x1" > nul
IF %ERRORLEVEL% NEQ 0 GOTO win8disable
reg QUERY HKLM\SOFTWARE\Microsoft\Windows\CurrentVersion\Policies\System /v ConsentPromptBehaviorAdmin | find "0x0" > nul
IF %ERRORLEVEL% NEQ 0 GOTO win8disable
GOTO end
:win7disable
reg ADD HKLM\SOFTWARE\Microsoft\Windows\CurrentVersion\Policies\System /v EnableLUA /t REG_DWORD /d 0 /f > nul
GOTO reboot
:win8disable
reg ADD HKLM\SOFTWARE\Microsoft\Windows\CurrentVersion\Policies\System /v PromptOnSecureDesktop /t REG_DWORD /d 0 /f > nul
reg ADD HKLM\SOFTWARE\Microsoft\Windows\CurrentVersion\Policies\System /v EnableLUA /t REG_DWORD /d 1 /f > nul
reg ADD HKLM\SOFTWARE\Microsoft\Windows\CurrentVersion\Policies\System /v ConsentPromptBehaviorAdmin /t REG_DWORD /d 0 /f > nul
GOTO reboot
:reboot
shutdown /r /t 60
:end
EXIT
Please note that the highlighted areas in the batch script are single lines. Even if they are displayed in this document on multiple lines, they must not contain line breaks in your batch file; replace line breaks with spaces as needed.
The batch script can be downloaded as a text file:
http://www.syamsoftware.com/wp-content/uploads/2013/05/disable-uac.txt
The batch script is designed to take no action:
- If the OS of the client machine is not Windows 7 or Windows 8. This excludes older operating systems that do not support UAC, and servers (because a reboot is required)
- If UAC is already disabled
Save the batch script file (in our example we use the filename disable-uac.bat) and place the file in the default application directory defined on the Administration Settings page of Management Utility.
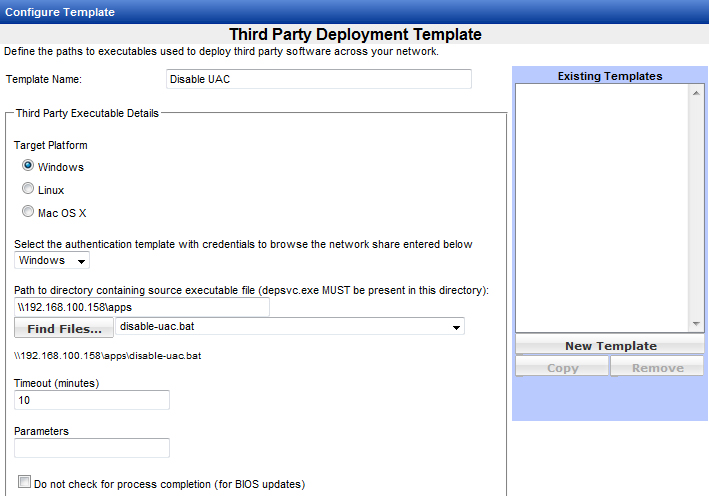
In Management Utility, create a Third Party template. Enter a template name. Choose Windows as the target platform and select the correct authentication template. Enter the path to the network share containing the source executable file; this will already be present if the default path has been entered in Administration Settings. Click the Find Files button and choose the batch script file from the drop down menu.
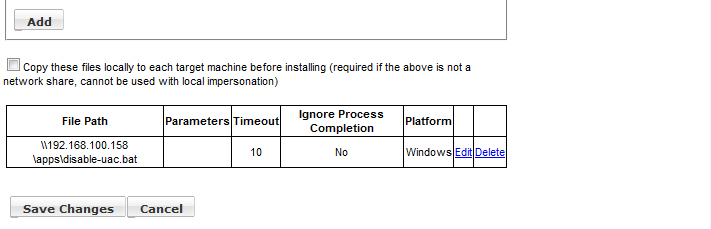
Click the Add button. Click the Save Changes button. Click OK to confirm.
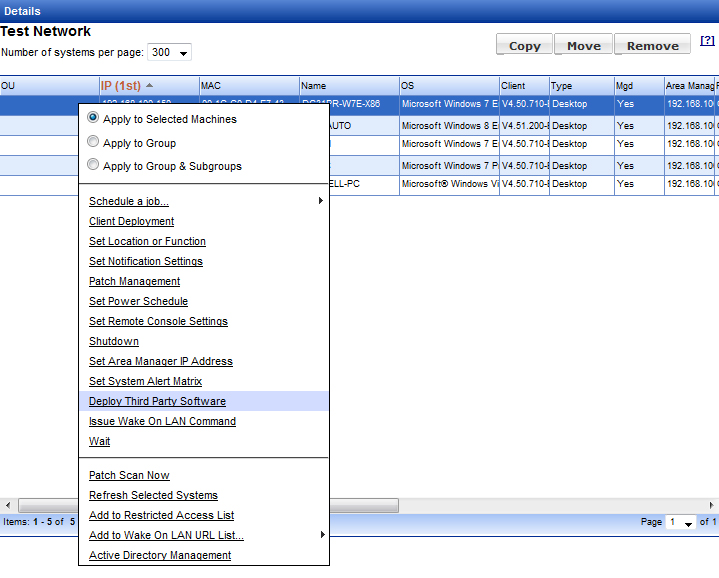
Now you can test deployment to a single system. Select a system in the Groups area, keeping in mind that the batch script may reboot the system. Click the system row, then right-click to display the context menu. From the menu, choose Deploy Third Party Software.
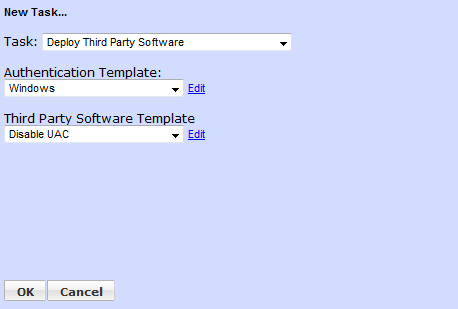
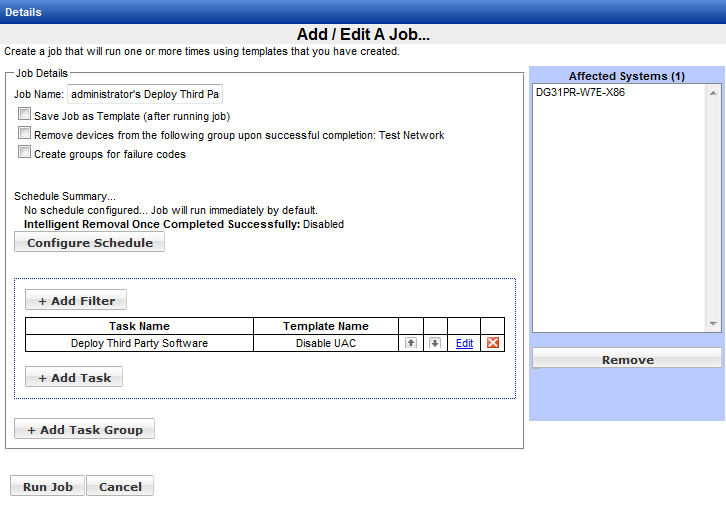
In the New Task box, choose the Windows authentication template and the newly created Disable UAC template. Click OK.
On the Add/Edit a Job page, click the Run Job button, then click OK to confirm. The job will begin shortly.
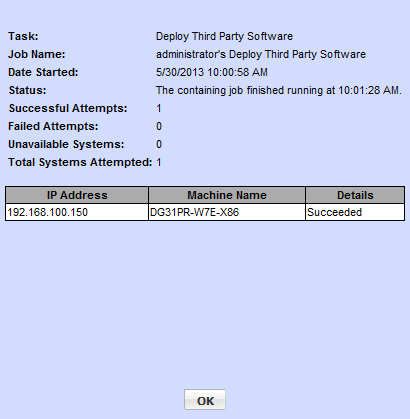
After the job is finished, you may review the status by finding the job in the Status area and clicking the View Details link.
Once you have deployed successfully on a single machine, you can use the Groups context menu options to deploy the batch script on multiple client machines, either as a one-time job run on demand, or a recurring scheduled job. Because the batch script performs a reboot after disabling UAC, you will want to make sure the job runs at a time when a reboot is acceptable.
Configuring UAC Group Policy for Active Directory
In an Active Directory environment you can configure a Group Policy Object on your domain to enforce UAC settings. In our example, we will configure a domain controller running Windows Server 2008 R2 to disable UAC for administrators.
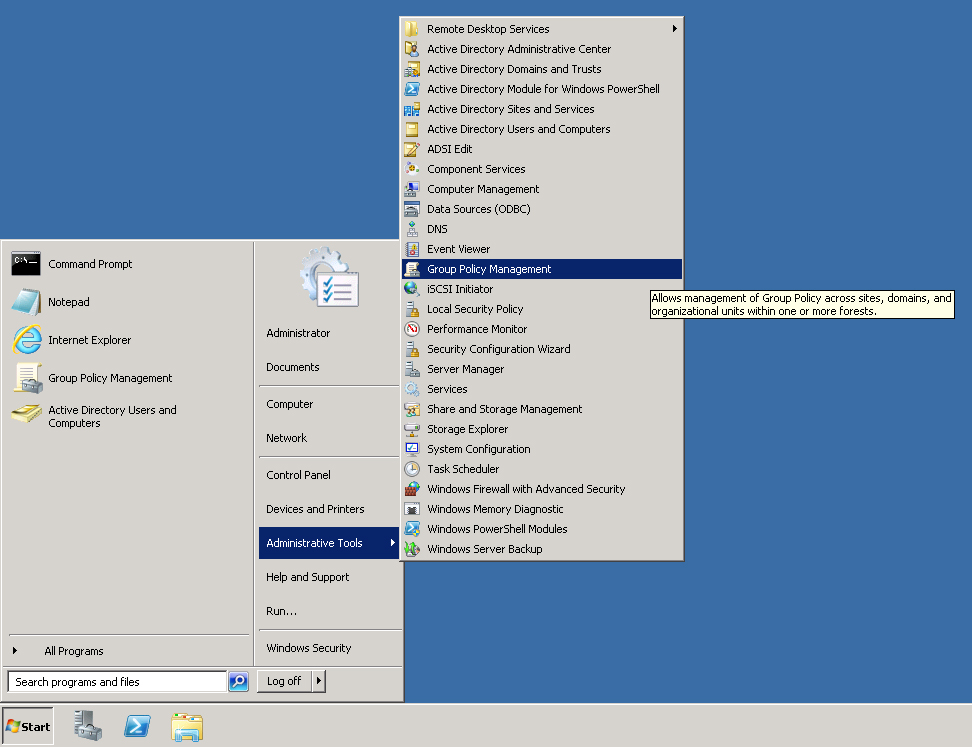
In the Start menu, go to Administrative Tools – Group Policy Management.
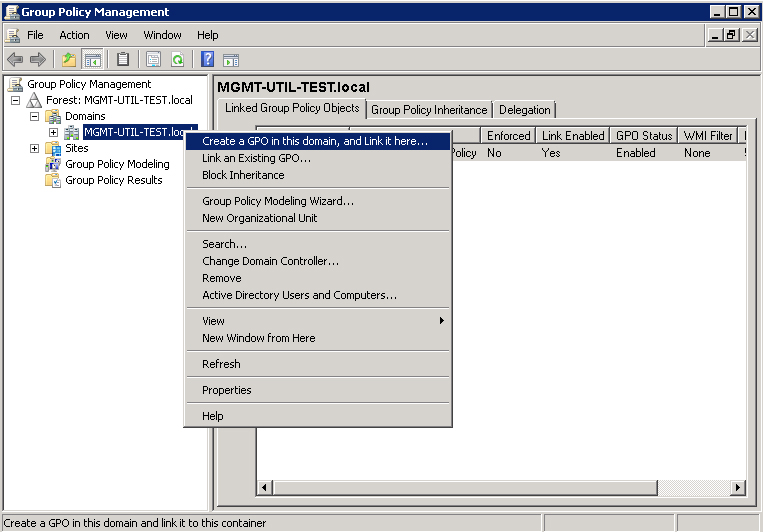
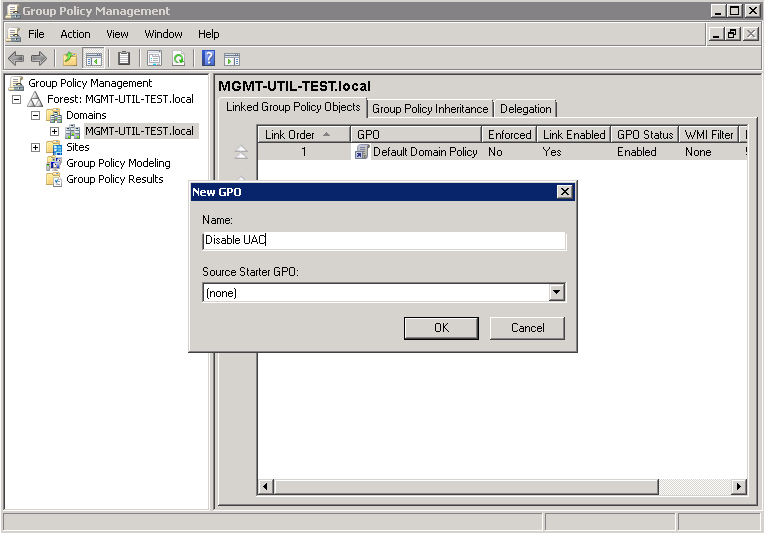
In the Console Tree at the left side of the Group Policy Management interface, navigate to Forest: <forest name> - Domains. Right-click the domain name, and in the menu, choose Create a GPO in this domain, and Link it here.
In the New GPO dialog, enter the policy name, then click OK.
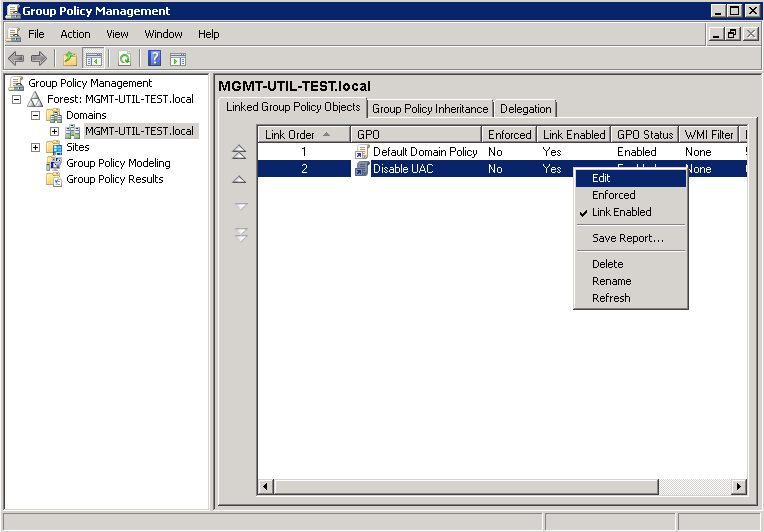
Right-click the policy and choose Edit from the menu.
In the Console Tree at the left side of the Group Policy Management Editor, navigate to Computer Configuration - Policies - Windows Settings - Security Settings - Local Policies - Security Options. Scroll down to display the User Account Control policies.
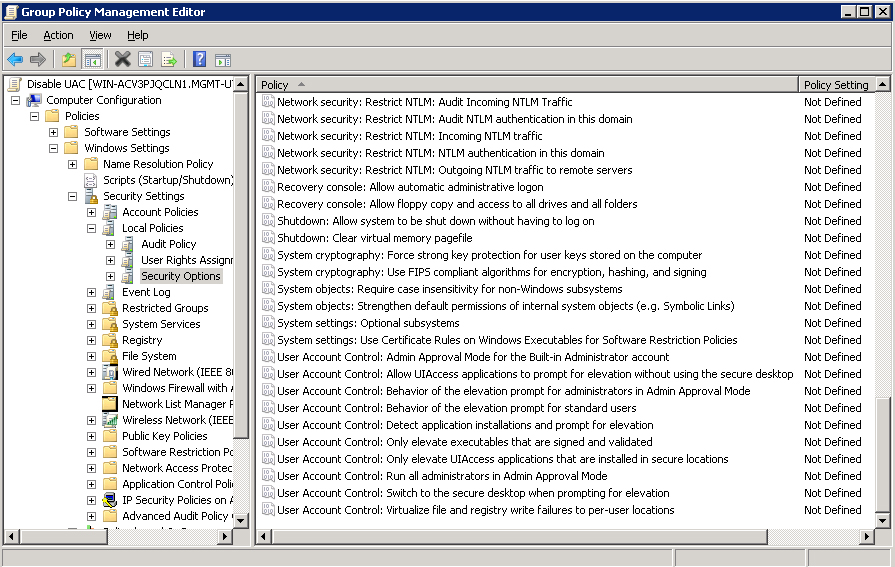
To edit a policy, right-click the policy and choose Properties. Check the box to define the policy setting. Select the setting from the menu provided, then click OK when finished.
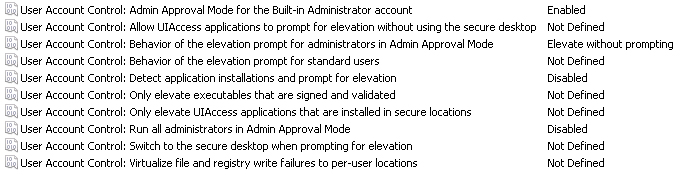
This configuration disables UAC for administrators:
POLICY: User Account Control: Admin Approval Mode for the Built-in Administrator account
POLICY SETTING: Enabled
POLICY: User Account Control: Behavior of the elevation prompt for administrators in Admin Approval Mode
POLICY SETTING: Elevate without prompting
POLICY: User Account Control: Detect application installations and prompt for elevation
POLICY SETTING: Disabled
POLICY: User Account Control: Run all administrators in Admin Approval Mode
POLICY SETTING: Disabled
Close the Group Policy Management Editor and the Group Policy Management interface. The new settings will take effect according to the normal Group Policy update schedule.