Microsoft Patch Management
The Management Utility allows you to perform Microsoft vulnerability scans and execute patch management silently to systems across your network, either on demand or through an automated process.
 Please note that systems must have the System Client installed, running and managed by a System Area Manager before you can perform Patch Management actions to them.
On-Demand Vulnerability Scan
To perform on-demand vulnerability select the systems that you wish to scan, press the right mouse button and choose the Patch Scan Now option.
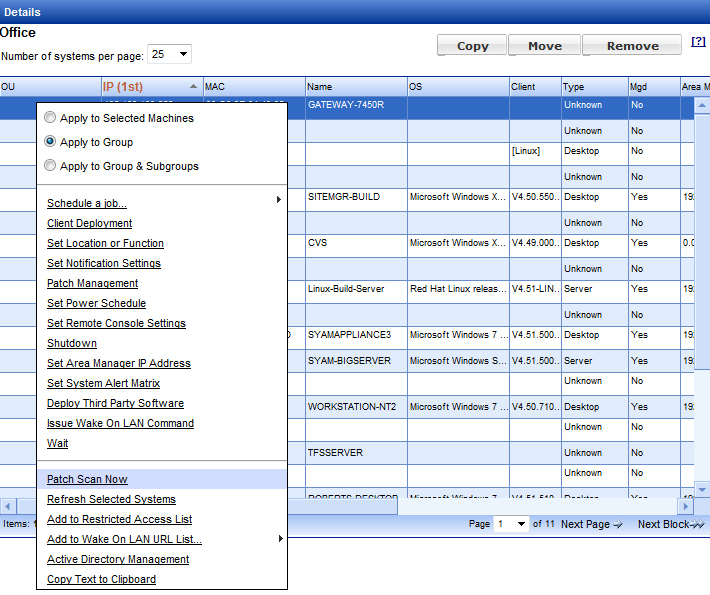
This brings up a window that allows you to define the scan name and authentication template to be used to access the target systems and to set the network shared path to the folder where you wish to store the identified patches. Change the settings as required and press the OK button to perform the scan. (Please note that for environments where User Account Control is enabled on Windows systems, patch scans and deployments should use the local admin authentication template.)

You can view the scan results by expanding the Patch Scans heading and the Groups window and then clicking on the Scan Name.

This screen provides a list of all identified patches missing from the systems scanned. You can filter the type of patches being displayed on screen by clicking on the Patch Type drop down menu. This menu allows you to select the following filters:
- Critical Updates
- Feature Packs
- Security Updates
- Service Packs
- Update Rollups
- Updates
- Windows Defender
 For example, we set the filter Patch Types to view the Critical Updates only.

You can perform patching on demand from this screen by checking off which patches you wish to deploy.
By default all check boxes are chosen but you can select and unselect specific patches by clicking the appropriate check box.
- You can select all or deselect all for a specific system by clicking on the check box next to the system name.
- You can select all or deselect all for a patch by clicking on the check box next to the patch name.
Once you have chosen the patches you wish to deploy, click on the Deploy Patches Now button and it will schedule the Patch Management Job for you to run immediately.
 Please Note that the Management Utility downloads the identified patch files automatically from Microsoft if it does not find them already stored on the network share defined for storing the patches.
Once the Patch Management job has completed you can view the details in the Status window.

Automated Patch Management
Patch Management can be automated and scheduled using the Management Utility.
In order to schedule a job we need to create a Patch Management Template which will define the types of patches you wish to scan and deploy.
To access the Management Templates, expand the Configure Templates option within the Functions Window, and the then click on Patch Management.
This will open up the Patch Management template screen.
Create a new Template or edit an existing template
Enter a Template name and check which types of patches are to be scanned and deployed when using that template.

 This example shows a template which will just scan and patch Critical updates
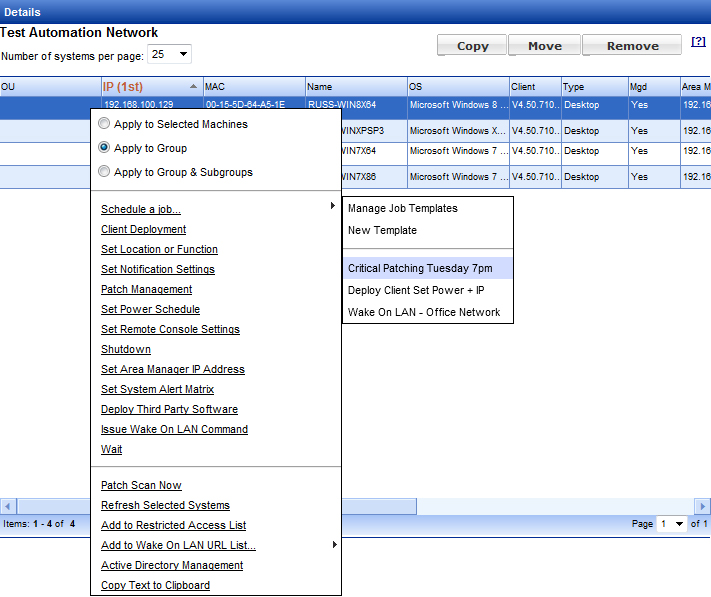
Now that we have this template created we can apply the Critical Patches template against a system or systems at any time. Select the systems, right click and choose Patch Management.

This brings up the Patch Management Job window. Choose the authentication template that will be required to access the target systems and the Patch Management template that you wish to run on the target systems.

Click the OK button and then on the Add/Edit Job window click the Run Job button to perform the patch management job.
You can automate the critical patching of systems by creating and scheduling a job that runs the Patch Management Template.
Click Manage Job Templates, then click Create a new job template.
Give your job a template name. Use a name that tells you what that job is doing and when it runs.
Click on Configure Schedule, create a new template, and set to recurring, but do not check the Intelligently remove option, as even if we successfully deploy patches to systems we wish to check for other patches every week on the systems. Set the start date and the time the job is to run, and set which days to run the job.


Once you have finished configuring the schedule click Add task, choose Patch Management, and then choose the Authentication Template and Patch Management template you wish to use for this job.

Then click Save Job as New Template to save the job.
 In our example we named the job Critical Patching Tuesday 7pm so we know exactly what this job will do and when it’s scheduled to run.
Now that we have the Critical Patch Job template set we can apply the job template to systems that have Clients and are managed by the System Area Manager.
Select the systems or group that you wish to apply the Critical Patch job to, right click and choose Schedule a job, then choose the job template you saved called Critical Patching Tuesday 7pm.
You can modify the details of the job if needed. Click the Run Job button to schedule the Critical Patching job to the group called Test Automation Network.

The scheduled job will now appear in the Daily section of Scheduled Jobs.

You can apply the job template to multiple groups of systems.
Windows Update Agent
The first time a patch scan or deployment is attempted on a client system, you may get an error to let you know that the operation failed because a current version of Windows Update Agent was not present on the client system. Windows Update Agent can be downloaded from Microsoft. There are separate versions for x86 (32-bit) and x64 (64-bit) systems:
WindowsUpdateAgent30-x86.exe: http://go.microsoft.com/fwlink/?LinkID=100334
WindowsUpdateAgent30-x64.exe: http://go.microsoft.com/fwlink/?LinkID=100335
The Third Party Software Installation feature of Management Utility can be used to install Windows Update Agent. Please refer to the chapter in this document entitled Third Party Application Deployment. For either version of Windows Update Agent 3.0, the command-line parameters for silent installation are:
/quiet /norestart /wuforce
You may also wish to refer to the SyAM Tool Tip “Installing Windows Update Agent”.