Install a Desktop Shortcut for Self Service Ticketing
Using Management Utilities to Install a Desktop Shortcut for Self Service Ticketing
To make it easy for end users to submit incident reports, use Management Utilities to deploy an icon on user desktops that points to the URL of the Site Manager’s Self Service Ticketing module. This procedure is supported for Windows 7 and Windows XP machines with the System Client installed and reporting to the System Area Manager.
Here is a Visual Basic script that will create the desktop icon.
'Create a WshShell Object
Set WshShell = Wscript.CreateObject("Wscript.Shell")
strOS = WshShell.ExpandEnvironmentStrings("%OS%")
If strOS = "Windows_NT" Then
strVerKey = "HKLM\SOFTWARE\Microsoft\Windows NT\CurrentVersion\"
strVersion = WshShell.regread(strVerKey & "ProductName")
Else
strVerKey = "HKLM\SOFTWARE\Microsoft\Windows\CurrentVersion\"
strVersion = WshShell.regread(strVerKey & "ProductName")
End if
retVal = InStr(strVersion,"XP")
If retVal = 0 Then
strPath=WshShell.expandEnvironmentStrings("%Public%")
strPath1=WshShell.expandEnvironmentStrings("%PROGRAMFILES%")
Else
strPath=WshShell.expandEnvironmentStrings("%ALLUSERSPROFILE%")
strPath1=WshShell.expandEnvironmentStrings("%PROGRAMFILES%")
End If
'Create a WshShortcut Object
Set oShellLink = WshShell.CreateShortcut(StrPath& "\Desktop\SyAM Help Desk.lnk")
'Set the Target path for the shortcut
oShellLink.TargetPath = "http://192.168.100.156/selfservice.aspx"
'Set the icon
oShellLink.IconLocation = StrPath1& "\Internet Explorer\iexplore.exe,1"
'Save the shortcut
oShellLink.Save
Items in boldface should be modified by the administrator so that the correct URL for the Site Manager is specified, and the shortcut is given a different name if desired. Save the script file; in this example, the script will be saved as shortcutscript.vbs.
Next, create a Windows batch file to run the VB script using cscript.
c:
cd \
cscript \\192.168.100.151\apps\shortcutscript.vbs
exit
The administrator should modify the batch file to use the correct path for the network share. Normally, this would be the same shared directory specified in the Administration Settings area of Management Utilities as the default directory for deployment of client software and third party applications. In any case, the file depsvc.exe must be present in this directory.
Save the batch file; in this example, the file will be saved as shortcutscript.bat. Copy the Visual Basic script file and the Windows batch file to the network share.
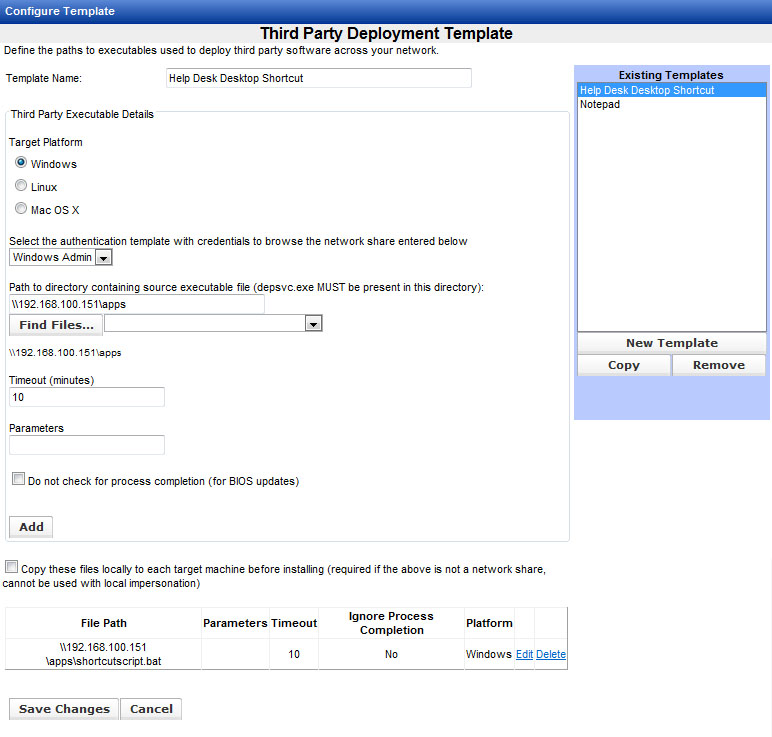
Browse to Management Utilities and create a Third Party Deployment Template. Enter a Template Name. Choose the Target Platform (Windows) and an authentication template with credentials to browse the network share and login to client machines with administrator privileges. Enter a path to the network share if necessary, then click the Find Files button to populate the drop down menu. Choose the Windows batch file. Click the Add button. Verify the correct batch file name and path, click Save Changes, then click OK to confirm.
To verify that the files and template have been created correctly, deploy the shortcut on a single machine. Identify a machine in the Groups interface. Click the machine, then right-click and choose Deploy Third Party Software. Choose the templates, then click OK to define the job. Click the Run Job button, then click OK to confirm. When the job is finished, review the job status message, then go to the client machine to verify that the icon functions as desired. The files and template can now be used to create a job that deploys the icon on a group of machines, and if desired, it can be set up to run as a recurring job on a regular schedule.
Using a Custom Icon
The same procedure can be used to copy an icon file to the system and use it for the desktop shortcut. The icon file should be placed in the shared directory along with the Visual Basic script file and the Windows batch file.
Modify the Visual Basic script to specify the icon file in the local directory where it will be placed, changing this line:
oShellLink.IconLocation = StrPath1& "\Internet Explorer\iexplore.exe,1"
to this:
oShellLink.IconLocation = "C:\customicon\custom.ico,0"
Before running the Visual Basic script, the Windows batch file should create a directory for the icon and copy the icon to the local directory. The resulting batch file should look like this:
c:
cd \
mkdir customicon
copy \\192.168.100.151\apps\custom.ico c:\customicon
cscript \\192.168.100.151\apps\shortcutscript.vbs
exit
Change the name of the icon file and the local directory, and the location of the network share, from the ones given in our example to the correct ones for your installation.